ShopDreamUp AI ArtDreamUp
Deviation Actions
![[ai adopt] cute octopus](https://images-wixmp-ed30a86b8c4ca887773594c2.wixmp.com/f/ddc18696-4f6c-45cb-9f33-d86c938029f4/dgs2d5i-67c0cb12-7197-41c8-b833-d0fc85ffbd80.jpg/v1/fill/w_350,h_350,q_70,strp/_ai_adopt__cute_octopus_by_1dollaradopts_dgs2d5i-350t.jpg?token=eyJ0eXAiOiJKV1QiLCJhbGciOiJIUzI1NiJ9.eyJzdWIiOiJ1cm46YXBwOjdlMGQxODg5ODIyNjQzNzNhNWYwZDQxNWVhMGQyNmUwIiwiaXNzIjoidXJuOmFwcDo3ZTBkMTg4OTgyMjY0MzczYTVmMGQ0MTVlYTBkMjZlMCIsIm9iaiI6W1t7ImhlaWdodCI6Ijw9MTAyNCIsInBhdGgiOiJcL2ZcL2RkYzE4Njk2LTRmNmMtNDVjYi05ZjMzLWQ4NmM5MzgwMjlmNFwvZGdzMmQ1aS02N2MwY2IxMi03MTk3LTQxYzgtYjgzMy1kMGZjODVmZmJkODAuanBnIiwid2lkdGgiOiI8PTEwMjQifV1dLCJhdWQiOlsidXJuOnNlcnZpY2U6aW1hZ2Uub3BlcmF0aW9ucyJdfQ.hO1rnUkkJ5SxNT5Npn65v2hInddI0yxw7Q0MZMxPcGA)


![Sunflower Step by Step [video process]](https://images-wixmp-ed30a86b8c4ca887773594c2.wixmp.com/f/c1d01877-9fe4-4a70-9cef-33d9a23da73b/dbw1b5p-faf499ce-e52f-4745-ad28-e3803cc36fd8.png/v1/crop/w_92,h_92,x_0,y_41,scl_0.12415654520918,q_70,strp/sunflower_step_by_step__video_process__by_halanlore_dbw1b5p-92s.jpg?token=eyJ0eXAiOiJKV1QiLCJhbGciOiJIUzI1NiJ9.eyJzdWIiOiJ1cm46YXBwOjdlMGQxODg5ODIyNjQzNzNhNWYwZDQxNWVhMGQyNmUwIiwiaXNzIjoidXJuOmFwcDo3ZTBkMTg4OTgyMjY0MzczYTVmMGQ0MTVlYTBkMjZlMCIsIm9iaiI6W1t7ImhlaWdodCI6Ijw9MjA0NiIsInBhdGgiOiJcL2ZcL2MxZDAxODc3LTlmZTQtNGE3MC05Y2VmLTMzZDlhMjNkYTczYlwvZGJ3MWI1cC1mYWY0OTljZS1lNTJmLTQ3NDUtYWQyOC1lMzgwM2NjMzZmZDgucG5nIiwid2lkdGgiOiI8PTc0MSJ9XV0sImF1ZCI6WyJ1cm46c2VydmljZTppbWFnZS5vcGVyYXRpb25zIl19.HMjZdssT0GKT-11tWKG2dxs3lQoTZW9ODcJPiGCaCGs)


Suggested Deviants


Suggested Collections


You Might Like…


Featured in Groups


Description
Youtube Tutorial Here: www.youtube.com/watch?v=F1uePY…
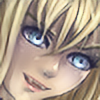
A tutorial on how to paint a Sea Shell! How fantastic! I hope it helps!
Drawings Featuring Shell Technique::origin()/pre06/eac9/th/pre/i/2016/355/6/7/noa_guess_who__by_halanlore-dasdp05.png)
:origin()/pre06/c9e9/th/pre/i/2016/341/7/5/clam_under_the_sea_by_philota-daqvcbb.png)
The Premium Content is the full resolution file of the Step by Step and a .psd with editable layers so you can see exactly how this was put together")
Errr not sure how helpful my little write up here is.
Step 1 Sketch the shell. Don't worry too hard about getting the lines absolutely perfect, we're just going to paint over them later.
Step 2 Create a layer under the lines and fill with a dark color (in this case I went with brown <.<). Lower the opacity of the lines down to 51% and set layer setting to multiply.
Step 3 Pick a lighter color, this time I used a sort of beigey brown, a less saturated lighter version of the main brown that makes up the body of the shell. Proceed to paint slightly curved lines along the entire swirl.
Step 4 This is when it starts to look like a shell. Create a brand new layer that's over everything else and set it's settings to multiply and shade the edges of each swirl. Blur the edges of the shading so it's smooth. This gives the illusion of roundness and full shellylikeness. Adjust the opacity of the layer until you think it looks good.
Step 5 Create a new layer on top of everything and this time set it's setting to luminosity. Highlight the middle of the swirl with a series of curved lines that mimic the stripes on your shell. Use the watercolor brush on Transparent color to blur so you have a smooth shine. (look it's starting to look like a shell!)
Step 6 I used the chance to darken the shadows towards the bottom and left of the shell to add depth. You can pick a dark brown to do this, or just use the multiply effect. Combine both to see what happens! On top of everything, create another layer (Again right?) set it to luminosity. Draw short little lines that run straight down the middle of the spiral. I made them in bunches of three. When you have your shell properly lined copy the layer. Lower the opacity of the original luminosity layer to 58%. Okay your good, leave this layer alone. Take the copy layer and slightly blur it down the middle of the shell. When it's suitably blurred, lower the opacity to 50%
Step 7 This is the fun part! I use this last step to adjust the little bits of the shell that need nitpicking. I also use this step to add pizzazz! To create an (optional) swirly look for you're shell, you can paint inward over the edges of the dark brown body of the shell with the white of the background, and bring the lighter stripes out for an ultradefined look. To get the shell colorful I created (Another) layer and set it to 'overlay' I colored over the shell with purple, blue, and pink. I erased all the overlay over the stripes, created another overlay layer and painted over the stripes with gold. This is all just a stylistic option, do what you feel like! It is your shell!
 More Tutorial
:origin()/pre13/321d/th/pre/i/2016/351/0/7/painting_an_eye_tutorial_by_halanlore-darws52.png)
A tutorial on how to paint a Sea Shell! How fantastic! I hope it helps!
Drawings Featuring Shell Technique:
The Premium Content is the full resolution file of the Step by Step and a .psd with editable layers so you can see exactly how this was put together
Errr not sure how helpful my little write up here is.
Step 1 Sketch the shell. Don't worry too hard about getting the lines absolutely perfect, we're just going to paint over them later.
Step 2 Create a layer under the lines and fill with a dark color (in this case I went with brown <.<). Lower the opacity of the lines down to 51% and set layer setting to multiply.
Step 3 Pick a lighter color, this time I used a sort of beigey brown, a less saturated lighter version of the main brown that makes up the body of the shell. Proceed to paint slightly curved lines along the entire swirl.
Step 4 This is when it starts to look like a shell. Create a brand new layer that's over everything else and set it's settings to multiply and shade the edges of each swirl. Blur the edges of the shading so it's smooth. This gives the illusion of roundness and full shellylikeness. Adjust the opacity of the layer until you think it looks good.
Step 5 Create a new layer on top of everything and this time set it's setting to luminosity. Highlight the middle of the swirl with a series of curved lines that mimic the stripes on your shell. Use the watercolor brush on Transparent color to blur so you have a smooth shine. (look it's starting to look like a shell!)
Step 6 I used the chance to darken the shadows towards the bottom and left of the shell to add depth. You can pick a dark brown to do this, or just use the multiply effect. Combine both to see what happens! On top of everything, create another layer (Again right?) set it to luminosity. Draw short little lines that run straight down the middle of the spiral. I made them in bunches of three. When you have your shell properly lined copy the layer. Lower the opacity of the original luminosity layer to 58%. Okay your good, leave this layer alone. Take the copy layer and slightly blur it down the middle of the shell. When it's suitably blurred, lower the opacity to 50%
Step 7 This is the fun part! I use this last step to adjust the little bits of the shell that need nitpicking. I also use this step to add pizzazz! To create an (optional) swirly look for you're shell, you can paint inward over the edges of the dark brown body of the shell with the white of the background, and bring the lighter stripes out for an ultradefined look. To get the shell colorful I created (Another) layer and set it to 'overlay' I colored over the shell with purple, blue, and pink. I erased all the overlay over the stripes, created another overlay layer and painted over the stripes with gold. This is all just a stylistic option, do what you feel like! It is your shell!
Image size
2557x2692px 2.44 MB
© 2016 - 2024 HalanLore
Comments5
Join the community to add your comment. Already a deviant? Log In
ohhh I like this, I will probably use it, awesome job  (Smile)")